

You’ve finally decided to hit the dirt, leave the pavement behind, and explore what real trail riding feels like. But standing in a sea of bike options, you feel completely lost. You don’t want to overpay for features you’ll never use, but you also don’t want a bike that falls apart after three rides. The good news? Finding the perfect entry-level mountain bike doesn’t have to be overwhelming. This guide strips away the marketing fluff and gives you a practical, actionable roadmap to buying your first real trail machine. Let’s get you rolling with confidence.
What Exactly Defines an Entry-Level Mountain Bike in 2025?
An entry-level mountain bike is a durable, affordable bicycle designed for beginner and intermediate riders tackling smooth to moderately rough dirt trails. Unlike cheap department store bikes, a true entry-level MTB includes critical features like a proper drivetrain, reliable brakes, and a frame geometry built for stability. These bikes typically cost between $500 and $1,200 and prioritize value without sacrificing safety.
In 2025, the bar for “entry-level” has risen significantly. Manufacturers understand that cheap bikes hurt the sport. Brands like Trek (Marlin series), Giant (Talons), and Specialized (Rockhopper) have dialed in entry-level builds that actually work out of the box. The key differences from a toy bike include the presence of a real suspension fork (even a basic coil fork is better than a rigid one), a 1x drivetrain (one chainring up front for simplicity), and mechanical disc brakes. These aren’t race bikes, but they are entirely capable of building your skills on green and blue trails.
Why Is Frame Material So Critical for a Beginner Mountain Bike?
Frame material determines the bike’s weight, durability, comfort, and cost. Aluminum is the undisputed king for entry-level mountain bikes. It offers the best balance of strength and weight for your money. Steel is heavier but more compliant on rough terrain, while carbon fiber is either absent from this price bracket or found on sketchy, low-quality models you should avoid.
When you are learning to ride, you will drop your bike, crash into rocks, and lean it against trees. Aluminum frames handle this abuse well without rusting. Look for a frame labeled “6061 aluminum” or “7005 aluminum.” These alloys are standard in the industry. Avoid any bike that doesn’t specify the material. If the manufacturer is vague, it is likely high-tensile steel, which is extremely heavy and prone to rust. A good aluminum frame keeps your bike light enough to maneuver on climbs and sturdy enough to survive the learning curve.
Hardtail vs. Full Suspension for Beginners
Hardtail mountain bikes (front suspension only) are the superior choice for entry-level riders. They are cheaper, lighter, more efficient to pedal uphill, and teach you proper body positioning. Full-suspension bikes at this price point are often poorly built, with heavy frames and unreliable rear shocks that bounce instead of absorbing bumps. Start on a hardtail to learn how to use your legs as suspension.
How Much Travel Should Your First Mountain Bike Have?
For trail riding, 100mm to 120mm of front suspension travel is the sweet spot for an entry-level mountain bike. This range provides enough squish to soak up roots and small rocks without making the bike feel vague or sluggish on climbs. More travel (130mm+) is unnecessary for beginners and adds weight and cost.
Suspension forks have two main types at this level: coil and air. Coil forks (usually Suntour XCE or XCT) are heavy but cheap and reliable for casual trail use. Air forks (like a RockShox Judy) are lighter and adjustable for your weight, offering a much better ride quality. If your budget allows a jump of about $200 to get an air fork, do it. It is the single best upgrade you can make. However, if you stick with a coil fork, ensure it has a “preload adjuster” knob, which lets you add a tiny bit of stiffness for heavier riders.
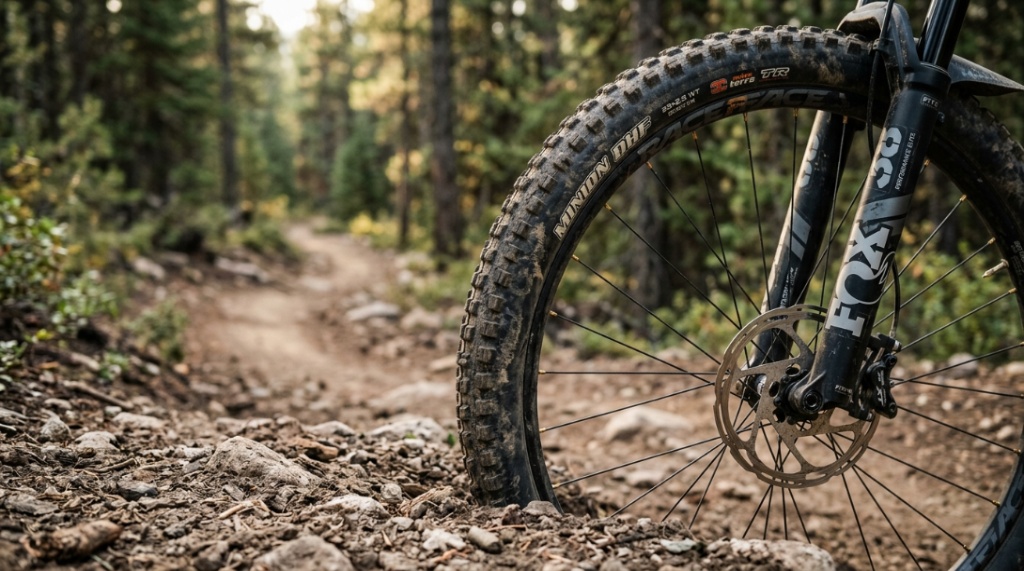
Which Wheel Size Is Best for a Beginner: 27.5 vs. 29?
Choose 29-inch wheels for general trail riding unless you are under 5’5″ tall. 29ers roll over obstacles more easily, maintain speed better, and provide more stability. 27.5-inch wheels are more maneuverable and accelerate faster but require more active riding to clear obstacles. For a beginner building confidence, the 29er’s stability is a major advantage.
There is a reason nearly every trail bike over $1,000 uses 29-inch wheels. The bigger tire diameter acts like a rolling bridge over roots and rocks. Smaller riders on 27.5-inch wheels must lift their front wheel over the same obstacles. For entry-level trail riding where technique is still developing, the 29er forgives mistakes. If you are between sizes, always go for the 29-inch option. It makes climbing easier and descending less scary.
What Drivetrain Specs Matter Most for a Beginner?
Look for a 1x drivetrain (pronounced “one-by”). This means there is a single gear sprocket on the front crank and a wide-range cassette on the rear wheel. A 1x system eliminates the front derailleur, which is a common source of mechanical problems. It simplifies shifting so you can focus on the trail. Aim for a MicroShift Advent X, Shimano Deore, or SRAM SX Eagle groupset.
A 1x drivetrain offers a gear range of roughly 400% to 450%. This is plenty of range to climb steep hills and pedal on flat sections. Avoid bikes with a 2x or 3x drivetrain (multiple front chainrings) because they are outdated, harder to maintain, and prone to dropping chains. The cassette should have at least 10 speeds (11 or 12 is ideal). More gears mean smaller jumps between them, making it easier to find a comfortable cadence.
Can You Trade Weight for Durability on an Entry-Level Bike?
Yes, and you should. On an entry-level mountain bike, durability always wins over weight. A bike that weighs 32 pounds but has proper tires, strong wheels, and reliable components will last for years. A bike that weighs 26 pounds but uses cheap, fragile parts will break quickly and cost more in repairs. Focus on build quality, not grams.
Beginners often stress about bike weight because they see pro riders on 22-pound machines. The reality is that the weight difference between a 30-pound bike and a 34-pound bike is negligible for someone learning. What matters is whether the wheels stay true after hitting a rock, and whether the brakes stop you in the rain. Spend your money on better tires and a stronger wheelset, not saving two pounds of frame weight. You can always upgrade lighter parts later.
Which Brake Type Is Safer for Trail Riding Beginners?
Hydraulic disc brakes are vastly superior to mechanical disc brakes for trail riding. They require less hand strength to operate, offer better modulation (feathering the brake), and automatically adjust as brake pads wear. While mechanical disc brakes stop the bike, they require frequent manual adjustment and don’t provide the same consistent stopping power on long descents.
Nearly all entry-level mountain bikes now come with mechanical disc brakes (like Tektro or Radius) to hit a price point. If you can stretch your budget to a model with Shimano MT200 hydraulic brakes, do it. The difference in control and confidence on a steep downhill trail is night and day. If you end up with mechanical brakes, learn how to adjust the cable tension yourself—it is easy and will keep your brakes working well until you upgrade.
How Should You Size an Entry-Level Mountain Bike?
Size your mountain bike based on the manufacturer’s size chart and your height, but also pay attention to “reach” and “standover height.” A properly sized bike allows you to stand over the top tube with a few inches of clearance and lets you reach the handlebars without feeling cramped or stretched. Visit a local bike shop to sit on models before buying.
Most brands use sizes like Small (5’0″–5’4″), Medium (5’4″–5’8″), Large (5’8″–6’0″), and XL (6’0″–6’4″). These are guidelines. Some bikes have longer “reach” numbers, which suit riders with longer torsos. If you are between sizes, consider sizing down for more maneuverability or sizing up for more stability. A bike that is too large will feel unwieldy and dangerous on tight turns. A bike that is too small will feel twitchy and uncomfortable on long rides. Always prioritize standover clearance; you should not be touching the top tube when flat-footed.
What Budget Should You Allocate for Essential Gear?
Plan to spend an additional $150 to $300 on essential gear beyond the bike itself. This includes a certified MTB helmet (MIPS recommended), a pair of flat pedals with metal pins (the stock plastic pedals are dangerous), a water bottle cage, a basic multi-tool, and a frame pump or CO2 inflator for trailside flats. This gear is not optional; it is safety equipment.
Many beginners blow their entire budget on a slightly nicer bike and then ride with terrible pedals that their feet slip off of, or no helmet at all. Do not do this. A $700 bike with $200 of good gear is a better experience than a $900 bike with no gear. You can always upgrade the bike next season. You cannot undo a head injury. Check your local bike shop for helmet fitting services—the best helmet is the one that fits snugly and comfortably.
Why Should You Consider a Specific Model Like the Schwinn High Timber?
The Schwinn High Timber is a popular budget-friendly option that fits the entry-level market, but it requires realistic expectations. It uses a steel frame and basic components, making it heavier than other options. However, for very casual trail riding or paved bike paths, it works. For a more detailed look at this specific model, check out this reliable Entry Level Mountain Bike that breaks down what you actually get.
If your budget is under $400, the Schwinn High Timber is a decent starting point. But if you can save another $200, you will jump into the realm of bikes with aluminum frames, real suspension, and hydraulic brakes. The Schwinn is a gateway bike—it gets you outside, but you will likely outgrow it within a year if you ride regularly. The important thing is to ride. Riding a heavier bike with basic parts is infinitely better than not riding at all because you were waiting for a “perfect” bike. Just understand the trade-offs.
How Do You Test Ride an Entry-Level Mountain Bike?
When you test ride, focus on how the bike feels, not how it looks. Walk into the shop with your riding shoes and helmet. Sit on the bike and have someone hold it while you bounce the suspension. Check if the reach feels comfortable. Ride it in a straight line, then make tight figure-8s. Test the brakes at slow speed. Shift through all the gears while pedaling lightly. The bike should feel natural and not fight you.
Don’t be afraid to ask the shop to adjust the saddle height or tilt before you ride. A saddle that is too low or tilted forward will make any bike feel terrible. Pay attention to the noise—a bike should be quiet. If you hear creaking, clicking, or grinding during a test ride, that bike likely has assembly issues. Also, ask about the return policy. Many shops offer a 30-day adjustment period where they will tune your bike for free. Good shops want you to succeed as a rider; bad shops just want your money.
When Is the Best Time of Year to Buy an Entry-Level Mountain Bike?
The best time to buy is between August and November, when manufacturers release new model years and dealers discount current stock. You can often find deals 15% to 30% off MSRP on previous model-year bikes. Spring (March to May) is the worst time to buy, as demand is highest and prices are firm. Late-season buying gives you the best value.
If you cannot wait for a seasonal sale, look for “year-end” clearance events at your local shop. Also, check online retailers but be cautious about assembly—many shops charge $50 to $100 to assemble a mail-order bike properly. Sometimes buying a bike from a local shop that’s $50 more expensive than an online deal is actually cheaper once you factor in assembly and free tune-ups. Always ask what is included with the purchase.
our height and where you plan to ride will heavily dictate your setup. If you are torn between agility and rolling speed, check out our breakdown on choosing between 26 and 27.5 Inch Mountain Bikes for Your Riding Style to find your perfect match.
Frequently Asked Questions
Do I need a dropper post on my first mountain bike?
No, you do not need a dropper post. It is a luxury that makes descending easier, but it adds significant cost. Learn to ride with a fixed seatpost first. You can always add a dropper post later as an upgrade. Focus on getting a quality bike frame and brakes first.
Is a 20-inch frame too big for a 5-foot-9 rider?
Yes, likely. A 20-inch frame is typically suited for riders 6’0″ or taller. A medium to large frame (17 to 19 inches) is better for a 5’9″ rider. Always refer to the specific brand’s sizing chart because “medium” varies greatly between manufacturers. Test riding is essential.
Can I ride a mountain bike on paved roads every day?
Yes, you can. Mountain bikes are less efficient on pavement due to their knobby tires and upright geometry. If you plan to ride 50% or more on pavement, consider buying a hybrid bike or a gravel bike instead. Otherwise, you will find pavement riding slow and noisy.
Should I buy used for my first mountain bike?
Yes, a used bike offers great value. However, only buy used if you know what to look for in terms of frame cracks, chain wear, and suspension condition. If you are unsure, bring a knowledgeable friend or shop mechanic. Avoid bikes older than five years, as component standards change rapidly.
Are men’s and women’s entry-level mountain bikes different?
The main differences are frame geometry and component sizing. Women’s-specific models often have shorter reaches, narrower handlebars, and wider saddles. However, many women ride men’s models comfortably. The best approach is to test both and choose the bike that fits best, regardless of label.
How often should I service an entry-level mountain bike?
Clean and lube your chain every 2–4 rides. Get a full tune-up at a shop every 6 months or after 100 miles of trail riding. Check your brake pads monthly. Regular maintenance is the cheapest way to keep your bike safe and fun to ride.
What tire width is best for entry-level trail riding?
Look for tires between 2.2 and 2.4 inches wide. This width provides excellent traction on dirt while still rolling reasonably well on pavement. Wider tires (2.5 inches) offer more grip but feel sluggish. Narrower tires (2.0 inches) are faster but provide less traction on loose trails.
Conclusion
Choosing the right entry-level mountain bike boils down to understanding a few critical factors: frame material (aluminum), suspension travel (100–120mm), wheel size (29er), brakes (hydraulic disc), and a 1x drivetrain. Forget the flashy paint jobs and marketing hype. Focus on what makes a bike reliable and safe for learning. Start with a hardtail, budget for essential safety gear, and don’t stress about weight. The perfect bike for you is the one that feels comfortable, fits your budget, and gets you on the trail regularly. Your first mountain bike is not your last; it is just the beginning of a fantastic adventure. Go visit a local bike shop, take a few test rides, and buy the bike that makes you smile the most. The trail is waiting.

Leave a Reply