

Planning a cycling route works best when you combine maps, traffic information, elevation, road conditions, and safety data before riding. Start with your destination, compare several route options, then select the route that balances distance, traffic, climbing, road quality, and emergency access. In 2024, 1,103 bicyclists died in traffic crashes in the United States.
Meanwhile, route planning tools can reveal details that a basic driving map often misses. A good cycling route should not simply get you there quickly. Instead, it should give you a manageable workload, predictable traffic, suitable road space, and enough places to stop. This guide explains how to turn several types of route data into one practical cycling plan.
Start With the Ride You Actually Want
Before opening a map, define what the ride needs to accomplish. A commuter route, training ride, family outing, and long distance tour require different planning decisions.
First, write down four basic details:
- Starting point: Where will the ride begin?
- Destination: Where must you finish?
- Distance: How far can you comfortably ride?
- Purpose: Are you commuting, training, exploring, or touring?
Next, consider your preferred riding environment. You might value protected bike lanes, quiet residential streets, scenic roads, steady climbs, or access to services.
Your priorities should shape the route rather than forcing the route to fit a fixed distance. A slightly longer road can make a much better ride when it avoids heavy traffic and difficult intersections.
Build the First Route With a Cycling Map
Use a cycling focused map instead of relying only on ordinary driving directions. Cycling maps can identify bike paths, trails, bike lanes, restricted roads, and other features that affect riders.
Start by entering your beginning and ending points. Then examine at least two or three possible routes before accepting the first suggestion.
Look closely at every major road between those points. A route may appear efficient on the screen while placing you beside fast moving traffic for several miles.
Check the Road Type
Classify each important section of the route before your ride. This simple step helps you understand what the map’s distance number cannot explain.
Look for:
- Protected bike lanes
- Painted bike lanes
- Shared roads
- Multiuse paths
- Residential streets
- Rural roads
- High speed corridors
- Bridges and tunnels
- Busy commercial areas
A route with several road types requires more attention than a route with consistent infrastructure. Therefore, mark every section where your riding environment changes significantly.
Inspect Intersections Separately
Do not judge a route only by its continuous road sections. Intersections can create greater difficulty than long stretches of otherwise comfortable riding.
Check complicated turns, multilane crossings, roundabouts, highway ramps, and intersections with limited visibility. If one route contains several difficult junctions, compare it against an alternative before deciding.
Use Traffic Information Before You Ride
Traffic data can change a reasonable cycling route into a poor one. Therefore, review traffic patterns for the actual time you expect to ride.
Morning traffic may create different conditions from afternoon traffic. School zones, commuter corridors, event venues, shopping districts, and construction areas can also change traffic behavior.
Look Beyond Traffic Speed
Traffic volume matters, but vehicle speed also deserves attention. A road with moderate traffic can feel uncomfortable when vehicles travel much faster than bicycles.
Consider these factors:
- Vehicle volume
- Typical vehicle speed
- Truck activity
- Bus activity
- Turning traffic
- Parking activity
- Lane width
- Shoulder availability
- Traffic signal frequency
Then compare those conditions with your riding ability. A confident road cyclist may tolerate conditions that feel unsuitable for a beginner.
Check Traffic at Your Riding Time
Route planning should reflect the clock, not just the road. If you commute at 8 a.m., inspect conditions around that period rather than midday.
Likewise, check the return journey separately. Evening traffic may become heavier, while daylight can disappear before you finish.
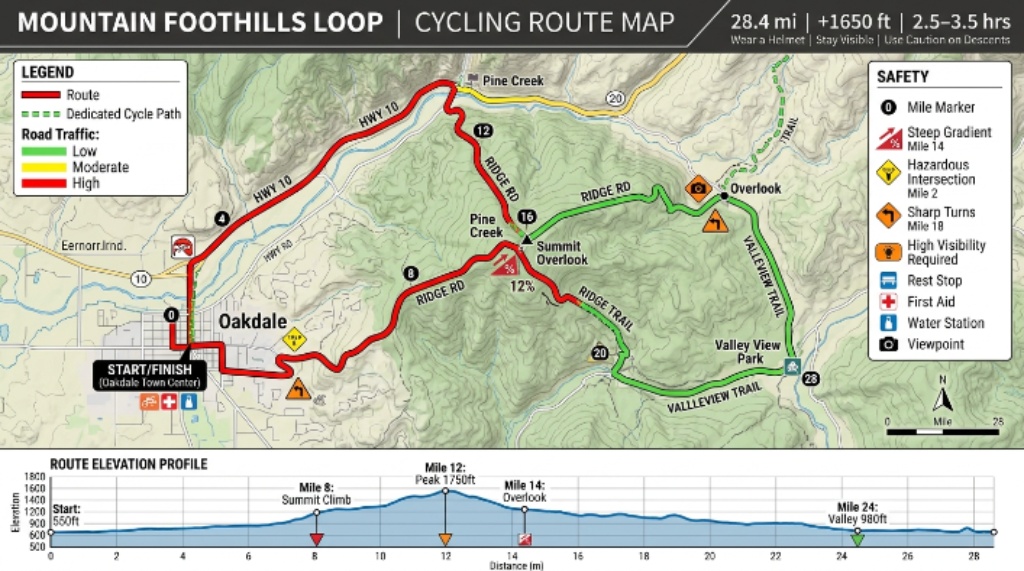
Treat Elevation as a Route Quality Factor
Distance alone cannot predict how difficult a cycling route will feel. Elevation provides a much clearer picture of physical demand.
Open the elevation profile for every serious route candidate. Look at total climbing, steepest sections, climb length, and when major climbs occur.
A route with modest total elevation can still feel difficult when it contains several steep ramps. Conversely, a longer route with gradual climbing may feel easier and more sustainable.
Study the Shape of the Climbs
Do not focus only on total elevation gain. Study how that elevation appears across the entire ride.
Ask yourself:
- Does the first major climb arrive early?
- Does the route contain repeated short climbs?
- Does one long climb dominate the route?
- Does the final section include a steep ascent?
- Can you stop near difficult sections?
- Does the route offer an easier alternative?
The timing of climbing matters because fatigue changes your ability to manage traffic and make decisions. A demanding final climb can also become uncomfortable after a long day.
Match Elevation With Your Fitness
Use recent rides as your benchmark. Compare the proposed elevation with routes you have already completed comfortably.
If your longest recent ride includes 1,500 feet of climbing, a sudden 3,500 foot route deserves careful preparation. Instead, increase distance and climbing gradually when building endurance.
Examine Safety Data Before Finalizing the Route
Safety data should influence route selection as much as distance and elevation. A route that saves ten minutes may not justify several difficult traffic sections.
Look for crash locations, reported cycling incidents, dangerous intersections, road closures, and recurring construction. Local transportation agencies, cycling organizations, and mapping platforms can provide useful clues.
NHTSA reported 1,103 bicyclist deaths in traffic crashes during 2024. That figure reinforces why route quality matters beyond convenience.
Identify High Risk Sections
Mark every location where several risks overlap. For example, a narrow road with fast traffic and poor visibility deserves more attention than a quiet neighborhood street.
Pay particular attention to:
- High speed intersections
- Highway entrance areas
- Narrow bridges
- Blind curves
- Heavy truck corridors
- Poorly maintained shoulders
- Complex roundabouts
- Frequent driveway crossings
- Roads with limited escape space
Then search for practical alternatives. Even a short detour can remove several risk factors from your ride.
Consider Road Surface Quality
Road quality affects both comfort and control. Cracks, potholes, loose gravel, drainage grates, debris, and damaged pavement can create problems for cyclists.
Check recent map imagery when available. Also consider whether weather could make the surface more difficult.
Wet leaves, standing water, mud, ice, and loose sand can change a familiar road quickly. Therefore, treat surface condition as part of route safety rather than a minor comfort issue.
Combine the Data Into a Route Score
Instead of choosing a route based on one attractive feature, score each candidate against the same criteria. This creates a clearer comparison when several routes appear reasonable.
Use a simple five point scale for each category:
- Traffic: 1 to 5
- Road safety: 1 to 5
- Elevation: 1 to 5
- Surface quality: 1 to 5
- Cycling infrastructure: 1 to 5
- Distance: 1 to 5
- Services: 1 to 5
- Navigation difficulty: 1 to 5
Give higher scores to routes that perform better for your specific needs. For elevation, for example, a lower climbing total can receive a higher score.
However, do not let the total score hide a serious safety problem. A route should not win simply because it offers a shorter distance.
Plan Rest Stops and Essential Services
A strong cycling route includes more than roads and turns. You should also know where you can stop for water, food, rest, repairs, and emergencies.
Mark useful locations before leaving:
- Water sources
- Grocery stores
- Cafes
- Public restrooms
- Bike shops
- Pharmacies
- Parks
- Transit connections
- Safe indoor locations
For longer rides, place potential stops at sensible intervals. You do not need to stop at every location, but knowing your options reduces pressure when plans change.
Also identify places where you can safely leave the route. Construction, fatigue, weather, mechanical problems, or unexpected traffic can force you to shorten a ride.
Build a Backup Route
Every well planned cycling route should have an exit strategy. Do not assume the original plan will remain practical throughout the ride.
Create at least one shorter alternative for longer trips. Your backup route should connect with roads, trails, transit, or public locations that make it easier to return safely.
Also save important route information offline. Mobile coverage can disappear in rural areas, valleys, tunnels, or remote trail sections.
Keep your route available through more than one method. A phone map, cycling computer, downloaded route file, and basic location awareness can provide useful redundancy.
Check Weather and Daylight
Weather can change route difficulty even when the road itself remains unchanged. Wind, rain, extreme heat, and low temperatures can affect your pace and decision making.
Check the forecast before leaving and compare it with your planned direction. Strong headwinds can make an otherwise easy route significantly harder.
Daylight deserves similar attention. Calculate your expected finish time instead of assuming you will maintain your planned pace.
Allow extra time for stops, traffic delays, mechanical problems, and navigation mistakes. Finishing earlier than expected gives you a useful safety margin.
Test Difficult Sections Before a Long Ride
Do not discover a route’s biggest problems halfway through an important trip. Test unfamiliar sections during a shorter ride whenever possible.
Ride the most complicated intersections, steepest climbs, and busiest roads first. This approach gives you firsthand information that maps cannot fully provide.
Pay attention to how the road actually feels. Traffic noise, sightlines, lane position, pavement quality, and driver behavior can differ from what digital maps suggest.
If a section feels consistently uncomfortable, redesign the route. A successful route should work in real conditions, not merely look good on a screen.
Create a Simple Pre Ride Checklist
A short checklist can prevent small planning mistakes from becoming major problems. Review the route shortly before departure because conditions can change.
Use this checklist:
- Confirm the starting location.
- Check current road conditions.
- Review traffic conditions.
- Check weather and wind.
- Review total climbing.
- Confirm water and food stops.
- Mark difficult intersections.
- Save the route offline.
- Check battery levels.
- Pack repair essentials.
- Carry identification and emergency information.
- Tell someone your planned route for longer rides.
Then review the return section separately. Many riders plan the outbound journey carefully but overlook the conditions they will face later.

Adjust the Route During the Ride
A route plan should guide your decisions, not trap you into following a bad situation. If conditions change, reassess the next section before continuing.
For example, heavy traffic may justify a detour. Unexpected road construction may make another street preferable.
Similarly, fatigue can change the safest route. A climb that seemed manageable earlier may become inappropriate after several hours.
Use your judgment and prioritize control, visibility, and safe road positioning. Arriving later remains better than forcing an unsafe route.
Common Route Planning Mistakes to Avoid
Even experienced cyclists can overlook basic planning details. Most mistakes happen when riders focus too heavily on one measurement.
Choosing the Shortest Route
The shortest route often prioritizes vehicle efficiency rather than cycling comfort. A slightly longer route can provide quieter roads and better infrastructure.
Ignoring the Return Journey
Your outbound route may feel easy because you have fresh legs. The same distance can feel very different after several hours.
Looking Only at Total Elevation
Total climbing does not show steepness, climb timing, or repeated gradients. Always inspect the complete elevation profile.
Trusting Automatic Routing Completely
Routing software can make useful suggestions, but it cannot understand every local condition. Review important sections manually before accepting its recommendation.
Skipping Local Knowledge
Local cyclists often know about recurring hazards, temporary closures, rough surfaces, and uncomfortable intersections. Their experience can reveal problems that digital data misses.
A Better Formula for Every Cycling Route
You can simplify the entire planning process into one repeatable sequence:
Map first, traffic second, elevation third, safety fourth, services fifth, backup last.
Start by creating several possible routes. Then remove options with excessive traffic, difficult intersections, poor surfaces, or unsuitable climbing.
After that, compare the remaining routes based on your fitness, purpose, weather, and available daylight. Finally, save the selected route and prepare one realistic alternative.
This process turns route planning from a simple navigation task into a practical risk management exercise. It also helps you make better decisions before fatigue and traffic complicate those decisions on the road.
Final Thoughts
The best cycling route is rarely the one with the fewest miles. It is the route that gives you a sensible balance of traffic exposure, climbing, road quality, infrastructure, services, and safety.
Use maps to understand the network, traffic information to understand road behavior, elevation data to measure physical demand, and safety data to identify hazards. Then add weather, daylight, rest stops, and backup options before you ride.
Start applying this method to your next cycling trip instead of accepting the first route your navigation app suggests. Compare your options carefully, test unfamiliar sections, and ride the route that gives you the strongest overall margin of safety and comfort.
Frequently Asked Questions
What is the best way to plan a cycling route?
Use a cycling map, traffic information, elevation profile, road condition data, and safety information before selecting your route.
How do I find a safe cycling route?
Look for lower traffic roads, dedicated cycling infrastructure, manageable intersections, good surfaces, and fewer known crash risks.
How much elevation is too much for cycling?
The right amount depends on your fitness, recent riding experience, distance, weather, and the steepness of individual climbs.
Should I choose the shortest cycling route?
Not necessarily, because a slightly longer route can provide safer roads, better surfaces, and lower traffic exposure.
Should I create a backup cycling route?
Yes, especially for long or unfamiliar rides, because construction, weather, fatigue, and mechanical problems can change your original plan.




Leave a Reply