
Wire rope is an essential component in countless lifting, rigging, and securing applications across industries. From construction sites to marine environments, properly terminated wire rope ensures safety and reliability. One of the most common methods for creating loops and terminations involves using clamps, yet many people install them incorrectly, creating dangerous weak points.
Understanding how to properly use these critical components can mean the difference between a secure connection and a catastrophic failure. This comprehensive guide will walk you through everything you need to know about selecting, installing, and maintaining clamps for safe and effective rigging operations.
Whether you’re a professional rigger, contractor, or someone working on a home project, mastering these techniques protects both people and property. Let’s explore the proper methods that ensure your rigging work meets safety standards and performs reliably under load.
Understanding Wire Rope Clamp Basics
Wire rope clamps serve a specific purpose in rigging applications. They create loops or eyes at the end of wire rope by securing the working end back to the standing part. This creates a strong termination point for attaching loads, hooks, or other hardware.
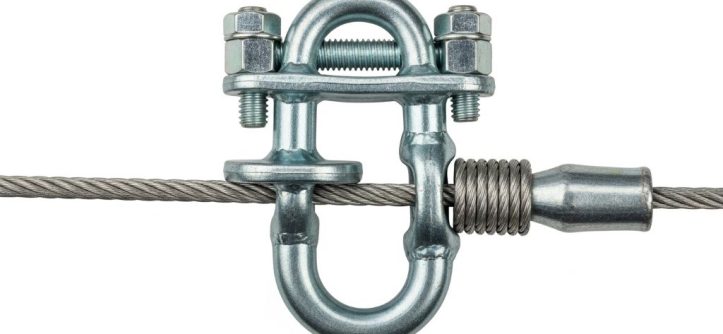
The U-bolt cable clamp represents the most common design used worldwide. This configuration features a U-shaped bolt that passes around the rope, a saddle that sits against the rope, and two nuts that tighten everything together. The design is simple yet effective when installed correctly.
These clamps come in various sizes to match different rope diameters. Using the correct size is crucial for achieving proper grip and load capacity. A clamp that’s too small won’t fully engage the rope, while one that’s too large won’t compress the rope adequately.
Material selection matters significantly in clamp performance. Most clamps are manufactured from forged steel, stainless steel, or galvanized steel. Each material suits different environments and corrosion resistance requirements. Marine applications typically demand stainless steel, while general construction often uses galvanized versions.
Quality varies dramatically among manufacturers. Inferior clamps may use soft metals that deform under load or break unexpectedly. Always purchase clamps from reputable suppliers who provide load ratings and material certifications.
Types of Wire Rope Fittings
Beyond the standard U-bolt design, several other wire rope fittings serve specialized purposes in rigging applications. Understanding these options helps you choose the right solution for your specific needs.
Single saddle clamps represent the most basic design. The saddle is a simple curved plate that distributes pressure across the rope surface. This traditional design works well for general applications but requires careful installation to achieve proper holding strength.
Double saddle clamps feature grooves on both sides of the connection. These grooves cradle both the live end and dead end of the rope, providing more uniform pressure distribution. They’re particularly useful in applications where the rope may experience dynamic loading or vibration.
Fist grip clamps use a different approach entirely. Instead of a U-bolt, they employ a wedge mechanism that grips the rope when loaded. These specialized fittings are often used in fall protection systems and applications requiring quick adjustment.
Swaged fittings create permanent connections by mechanically compressing a metal sleeve onto the rope. While not technically clamps, they’re worth mentioning as an alternative that provides superior strength. However, they require specialized equipment and cannot be disassembled.
Each fitting type has specific applications where it excels. Standard clamps work well for general lifting and securing. Specialized designs serve unique purposes in more demanding or specific applications.
Selecting the Right Clamp Size and Quantity
Proper clamp selection begins with knowing your wire rope diameter. Measure the rope carefully, as even small sizing errors can compromise connection strength. The clamp must match the rope diameter exactly according to manufacturer specifications.
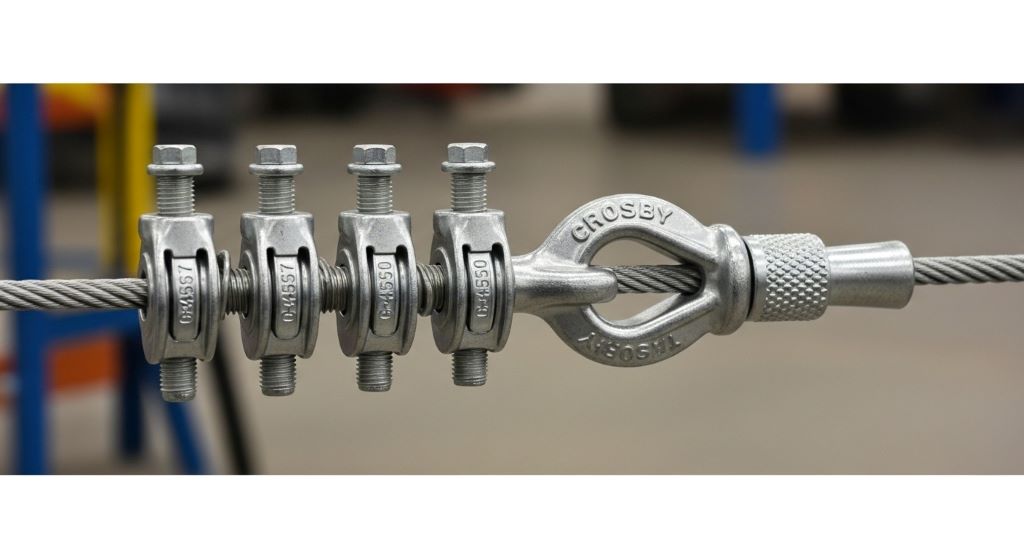
Load requirements determine how many clamps you need. A single clamp never provides adequate security for critical applications. Industry standards specify minimum quantities based on rope diameter and expected loads. Following these guidelines is not optional if safety matters.
For most applications, you’ll need at least three clamps on ropes up to one inch in diameter. Larger ropes require additional clamps. Consulting load charts from clamp manufacturers gives you precise requirements for your specific situation.
Spacing between clamps follows specific rules that ensure even load distribution. The clamps should be positioned at regular intervals along the rope tail. Insufficient spacing concentrates stress at individual clamps, potentially causing premature failure.
The tail length beyond the last clamp also matters. You need adequate rope extending past the final clamp to prevent the connection from pulling apart. Generally, a minimum of six rope diameters of tail length provides the necessary safety margin.
Environmental factors influence material selection. Saltwater environments demand stainless steel clamps to prevent corrosion. Outdoor applications in less corrosive conditions can use hot-dip galvanized clamps. Indoor applications with climate control may work fine with standard steel clamps.
The Critical Rule for Clamp Orientation
Perhaps the most important aspect of clamp installation involves proper orientation. Installing clamps backwards dramatically reduces their holding strength and creates a hazardous situation. Unfortunately, this mistake happens frequently in the field.
The fundamental rule is simple but absolutely crucial. The saddle always goes on the live side of the rope, while the U-bolt goes on the dead end. Think of it this way: never saddle a dead horse. This memorable phrase helps people remember the correct orientation.
When the saddle sits on the live side, it distributes pressure evenly across the load-bearing portion of the rope. The smooth, curved surface of the saddle protects the rope from damage while maintaining its strength. This configuration allows the rope to carry its full rated capacity.
Conversely, when someone mistakenly places the U-bolt on the live side, several problems arise. The bolt can crush and distort the rope strands, significantly weakening them. The sharp edges of the bolt threads can cut into individual wires, creating stress concentrations that lead to premature failure.
Testing has shown that backwards installation can reduce holding strength by up to 50 percent. This reduction might seem academic until you consider what happens when a load approaches the rope’s capacity. A connection that should safely hold might fail catastrophically, potentially causing injuries or fatalities.
Marking your clamps before installation helps prevent orientation mistakes. Some professionals use paint or tape to identify which side faces the live rope. This simple step eliminates confusion, especially when working in awkward positions or poor lighting conditions.
Step-by-Step Installation Process
Proper installation requires methodical attention to detail. Rushing through the process or skipping steps compromises connection strength. Follow this proven sequence for reliable results every time.
Start by determining your required loop size. Measure carefully, as you cannot easily adjust the loop after tightening the clamps. Remember to account for any thimbles or other hardware you’re incorporating into the loop.
Form the loop and overlap the rope tail with the standing part. Ensure you have adequate tail length extending beyond where your last clamp will sit. Running short on tail length means starting over, so measure generously.
Install the first clamp approximately one rope diameter from the loop. Position it with the saddle on the live side and the U-bolt on the tail. Thread the nuts onto the U-bolt but don’t tighten them yet. Hand-tight pressure is sufficient at this stage.
Add the remaining clamps at proper intervals along the overlapped section. Maintain consistent spacing between clamps. All clamps should face the same direction, with saddles on the live rope and U-bolts on the tail.
Begin tightening the clamps systematically. Start with the clamp closest to the loop and work toward the tail. Tighten the nuts in a crisscross pattern, alternating between each nut to apply even pressure. This prevents cocking the saddle and ensures uniform compression.
Use a calibrated torque wrench for final tightening. Manufacturer specifications provide exact torque values based on clamp size. Under-tightening allows the rope to slip, while over-tightening can damage the rope or strip the threads.
After initial tightening, apply a test load if possible. Loading the connection causes the rope to settle and compress slightly. This settling is normal and expected. However, it means you’ll need to retighten the clamps after the initial loading.
Incorporating Thimbles for Added Protection
Thimbles significantly improve the longevity and strength of wire rope loops. These teardrop-shaped metal inserts fit inside the loop, providing a smooth bearing surface and preventing the rope from bending too sharply.
Sharp bends in wire rope concentrate stress on individual strands. Over time, this stress causes fatigue and premature failure. Thimbles maintain a proper bend radius that keeps stress levels within acceptable limits.
Installing a thimble requires forming your loop around the thimble before securing the clamps. The thimble should fit snugly inside the loop without excessive movement. A loose thimble can shift under load, potentially causing uneven wear or rope damage.
Thimble size must match your rope diameter and the hardware you’re connecting to. The groove in the thimble should closely match your rope diameter. Too much clearance allows the rope to shift, while insufficient clearance prevents proper seating.
Heavy-duty applications warrant using thimbles rated for the expected loads. Standard thimbles work for general purposes, but high-load applications may require forged or heavy-wall thimbles. These robust designs resist deformation under extreme loads.
Stainless steel thimbles cost more but provide superior corrosion resistance. For marine applications or environments with chemical exposure, the additional investment pays dividends in extended service life.
Common Installation Mistakes to Avoid
Even experienced riggers sometimes make mistakes when installing clamps. Recognizing these common errors helps you avoid them and creates safer rigging practices.
Installing an insufficient number of clamps tops the list of dangerous mistakes. Some people assume one or two clamps are adequate for small loads. However, standards exist for good reasons, and meeting minimum clamp quantities is not negotiable for safe operations.
Backwards installation remains surprisingly common despite clear warnings. Always double-check clamp orientation before tightening. Taking an extra moment to verify prevents a mistake that could have catastrophic consequences.
Inadequate tightening causes slippage under load. Many people tighten clamps by feel rather than using a torque wrench. While experience helps, only a calibrated torque wrench ensures you achieve proper tightness consistently.
Mixing clamp sizes on the same connection creates uneven pressure distribution. All clamps on a single connection should be identical in size and type. This uniformity ensures each clamp contributes equally to holding strength.
Using damaged or corroded clamps compromises safety. Inspect clamps before installation and discard any showing cracks, excessive corrosion, or thread damage. The cost of new clamps is insignificant compared to the risk of failure.
Failing to retighten after initial loading allows connections to loosen over time. Many rigging failures occur not from improper initial installation but from inadequate maintenance and retightening.
Inspection and Maintenance Requirements
Wire rope connections require regular inspection to ensure ongoing safety. Developing a systematic inspection routine catches potential problems before they cause failures.
Visual inspection should occur before each use in critical applications. Look for signs of rope damage at the clamp locations, including crushed strands, broken wires, or unusual wear patterns. These indicators suggest problems with the installation or excessive loading.
Check clamp tightness regularly. Nuts can loosen due to vibration, thermal cycling, or settling of the rope. Use your torque wrench to verify proper tightness during routine maintenance intervals. Retighten as necessary to maintain specifications.
Examine the clamps themselves for signs of damage or corrosion. Surface rust on galvanized clamps is normal, but deep pitting or cracks indicate the clamps need replacement. Stainless steel clamps should show minimal corrosion, and any significant deterioration suggests environmental factors beyond their capabilities.
Document your inspections, especially for critical or commercial applications. Written records demonstrate due diligence and help track the service history of rigging equipment. This documentation proves valuable if questions arise about safety practices or equipment condition.
Replace clamps on a regular schedule based on usage intensity and environmental exposure. Even properly installed and maintained clamps eventually wear out. Establishing replacement intervals prevents using worn components past their safe service life.
Load Capacity and Safety Factors
Understanding load ratings helps you select appropriate hardware for your applications. Wire rope clamp connections never achieve 100 percent of the rope’s breaking strength, and you must account for this reduction when calculating safe working loads.
Properly installed clamps typically achieve 80 to 85 percent of the rope’s rated breaking strength. This reduction occurs because the clamps create stress concentrations and alter how the rope distributes loads internally. While this might seem like a significant loss, it’s predictable and acceptable when properly considered.
Safety factors provide additional margin beyond theoretical breaking strength. A common safety factor of 5:1 means the equipment should support five times the expected working load. This margin accounts for unknowns like shock loading, wear, and environmental factors.
Calculating safe working loads requires considering both the rope rating and the clamp efficiency. Start with the rope’s breaking strength, reduce it by the clamp efficiency factor, then divide by your safety factor. The result gives you the maximum load that should ever be applied to the connection.
Dynamic loads create additional considerations. Shock loading can generate forces many times greater than static weights. If your application involves any sudden loading, stopping, or impact forces, increase your safety factor accordingly.
Temperature extremes affect material properties. Both wire rope and clamps may lose strength at temperature extremes. Consult manufacturer specifications if your application involves unusual temperatures.
Applications and Industry Standards
Different industries have specific standards governing wire rope and clamp usage. Familiarizing yourself with relevant regulations ensures your rigging practices meet legal and safety requirements.
Construction sites fall under OSHA regulations that specify minimum requirements for rigging equipment. These standards mandate proper installation, regular inspection, and documentation of rigging operations. Compliance is legally required, and violations can result in citations and fines.
Maritime applications must meet Coast Guard or classification society standards. These standards often exceed general industrial requirements due to the harsh marine environment and safety-critical nature of shipboard operations.
Entertainment rigging, including theatrical and concert applications, follows extremely stringent standards. The potential for harm to large numbers of people demands conservative design practices and rigorous inspection protocols. Many jurisdictions require licensed professional engineers to approve rigging designs.
Oil and gas operations typically reference API standards that specify materials, installation procedures, and inspection frequencies. These comprehensive standards reflect the high-risk nature of petroleum industry operations.
Personal use applications don’t face the same regulatory requirements as commercial operations. However, following professional standards makes sense for anyone’s safety. Your life has value regardless of whether regulations specifically protect it.
Alternatives to Standard Clamps
While clamps represent the most common termination method, several alternatives offer advantages in specific situations. Understanding these options expands your rigging capabilities.
Swaged fittings provide the strongest possible connection, typically achieving 95 to 100 percent of rope breaking strength. Hydraulic presses compress a metal sleeve onto the rope, creating a permanent connection. The downside is that specialized equipment is required, and connections cannot be disassembled.
Spelter sockets create permanent terminations by bonding the rope into a metal socket using molten zinc or epoxy resin. These extremely strong connections are used in permanent installations like elevators and bridges. However, they require skill to install correctly and cannot be reused.
Mechanical splicing sleeves offer a middle ground between clamps and swaged fittings. These devices use mechanical means to grip the rope without requiring hydraulic tools. Some designs allow disassembly, providing flexibility for applications requiring adjustments.
Wire rope clips represent a temporary or light-duty alternative. These spring-loaded or screw-type devices provide quick connections but lack the holding strength of proper clamps. They’re suitable for non-critical applications like guying or temporary securing.
Each alternative has specific applications where it excels. Choosing the right termination method requires balancing factors like required strength, permanence, available tools, and cost.
Troubleshooting Common Problems
Even with proper installation, problems occasionally arise. Recognizing symptoms and understanding their causes helps you address issues before they become dangerous.
Rope slippage indicates inadequate clamping force. This problem typically results from insufficient tightening, too few clamps, or using clamps that don’t match the rope diameter. The solution involves checking torque values and adding clamps if necessary.
Visible rope damage at clamp locations suggests several possible issues. Backwards installation causes crushing and strand damage. Over-tightening can produce similar effects. Examine the damage pattern to determine the cause, then reinstall the connection properly.
Rapid clamp loosening points to vibration or dynamic loading issues. Consider adding lock washers or using thread-locking compound on the nuts. Alternatively, more frequent retightening intervals may be necessary for your specific application.
Corrosion affecting clamps or rope requires assessing environmental factors. You may need to upgrade to more corrosion-resistant materials or implement more aggressive maintenance procedures. In marine environments, regular freshwater rinsing extends component life significantly.
Premature rope failure near clamps often indicates the connection operates beyond its design limits. Review your load calculations and safety factors. You may need larger diameter rope, additional clamps, or alternative termination methods.
Conclusion
Properly using wire rope clamps creates safe, reliable connections for countless rigging applications. The U-bolt cable clamp design has proven itself through decades of use when installed correctly. However, improper installation remains a leading cause of rigging failures and accidents.
Success requires selecting appropriate wire rope fittings for your specific application, installing sufficient clamps in the correct orientation, and tightening them to proper specifications. Never saddle a dead horse reminds you that saddles always go on the live rope side. Following this simple rule prevents the most common installation mistake.
Regular inspection and maintenance ensure your connections remain safe throughout their service life. Check tightness after initial loading and periodically during use. Replace any damaged or corroded components immediately. Documentation demonstrates your commitment to safety and provides valuable maintenance history.
Understanding load ratings, safety factors, and industry standards helps you design rigging systems that protect people and property. While regulations may not apply to every situation, following professional standards makes sense for everyone’s safety. The principles that protect commercial riggers work equally well for personal projects.
Taking time to properly install and maintain wire rope connections pays dividends in safety and reliability. These simple yet critical components deserve careful attention and respect. Your diligence in following proper procedures ensures that your rigging work performs as intended when lives and property depend on it.
Frequently Asked Questions
How many wire rope clamps do I need for my application?
The required number depends on your wire rope diameter. For ropes up to 5/8 inch, use a minimum of three clamps. Ropes from 3/4 inch to 7/8 inch require four clamps. Ropes one inch and larger need at least five clamps. Additionally, consider your load requirements and safety factors. Critical applications or heavy loads may warrant additional clamps beyond these minimums for extra security.
Can I reuse wire rope clamps from old connections?
You can reuse clamps if they show no signs of damage, excessive corrosion, or thread wear. Carefully inspect each clamp before reuse. Check for cracks in the saddle or U-bolt, stripped threads, or any deformation. If threads are damaged or you cannot achieve proper torque specifications, discard the clamp. In critical applications, many professionals prefer using new clamps to eliminate any uncertainty about condition.
What torque specifications should I use when tightening clamps?
Torque specifications vary by clamp size. For 1/4 inch rope, use 15 foot-pounds. For 1/2 inch rope, use 45 foot-pounds. For 3/4 inch rope, use 65 foot-pounds. Larger sizes require progressively more torque. Always consult the manufacturer’s specifications for your specific clamps, as values vary between manufacturers and materials. Using a calibrated torque wrench ensures you achieve proper tightness consistently.
How far apart should I space multiple clamps?
Space clamps at intervals of approximately six times the rope diameter. For example, if you’re using 1/2 inch rope, place clamps about three inches apart. This spacing ensures even load distribution across all clamps without causing stress concentrations. The first clamp should sit one rope diameter from the loop, with subsequent clamps spaced along the tail at these regular intervals.
Do I need to retighten clamps after initial installation?
Yes, retightening is essential for safety. Apply a test load to the connection if possible, then retighten all clamps to the specified torque. The initial loading causes the rope to settle and compress slightly, which loosens the clamps. Additionally, inspect and retighten clamps periodically during use, especially after the first few loading cycles. Vibration and thermal cycling can also cause gradual loosening over time.
Related Topics:
How Do You Choose the Right Rope for Tree Climbing With Minimal Environmental Impact?
Is Skipping Rope a Good Exercise for Middle-aged People


Leave a Reply